
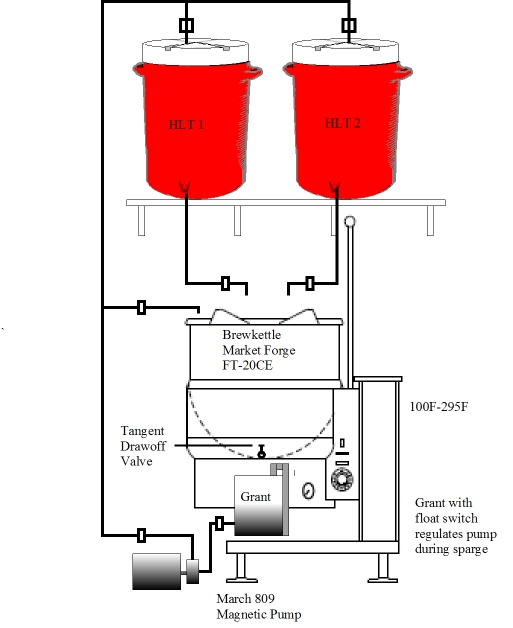
NOTE: This is just a design. I do not have this system, but if I ever come into a significant amount of disposable income – this would be the system I would build.
![]()
PDF file describing the Market Forge FT-20CE 2/3 jacketed electric steam kettle.
Close up image of the March 809 pump.
I’ve been thinking about a steam jacketed kettle for several years now. First, I should qualify the conversation by confessing that I spent 6 years in the Navy – most of that time in the steam plant of Nuclear Powered Aircraft Carrier. I figure if you can push 101,196 tons through the water and generate enough electricity to power a city and fling airplanes off the deck like they’re toys with steam – then you can probably brew some beer too! I’ve forgotten all the physics terms – entropy, enthalpy, latency, etc. Lets put it this way, steam under pressure carries a lot of energy.
I’ve tried using steam injection in the past, but didn’t have a sufficient boiler so it was fairly clumsy. I’ve seen several commercial boil kettles that use steam injection to boil wort. It’s not a new concept.
Okay, so lets run through a brew day using the single kettle-double HLT configuration.
1. Do prep to get the kettle ready (check water levels, vacuum, etc.)
2. Fill kettle with sufficient amount of water for mashing in (strike water) and for sparging.
3. Heat water in kettle to strike temperature. Pump to HLT1.
4. Continue to heat water to sparge temperature. Pump to HLT2.
5. Mash in using water from HLT1. This should get you close to your first rest temperature (acid rest, protien rest or mash temperature). You can undershoot the temp and adjust it later using the kettle. The reason I selected the Market Forge FT-20CE is because it supports temps from 100F – 298F. Most steam kettles are only rated from 145F.
6. After your rest period is done, step to the next rest point. Again, the reason this kettle is great. You can rest your mash at the low end of the spectrum (142F) to the high end (158F). After starch conversion is complete, raise the kettle temp to mash out (168F). Note you can add a mash mixer to your system or you can continuously stir to ensure there are no dough balls and to improve your mash efficiency. With Gott/Rubbermaid coolers, you are discouraged from opening the system due to heat loss.
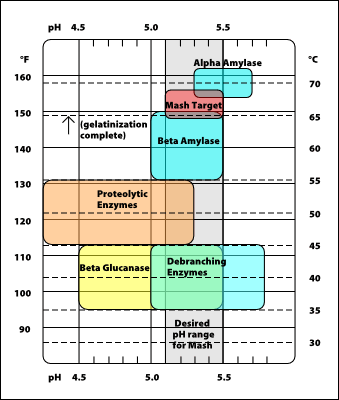
| Temp °C | Temp °F | Enzyme | Breaks down |
|---|---|---|---|
| 40 °C | 104.0 °F | β-Glucanase | β-Glucan |
| 50 °C | 122.0 °F | Protease | Protein |
| 62 °C | 143.6 °F | β-Amylase | Starch |
| 72 °C | 161.6 °F | α-Amylase | Starch |
7. Sparge with the water stored in HLT2. The wort will drain into the grant. Pump the wort into HLT1 for storage (it would help to heat this to get the wort near boiling temperatures.)
8. When you’ve collected sufficient wort for your boil, stop the sparge. Remove all grains and wort from the kettle [this will be nasty work.] Rinse with sufficient water to get rid of all the husks.
9. Drain the wort from HLT1 back into the kettle. Raise temps to boiling. Follow your recipe for boil times and hop additions.
10. Get recirc tub ready for chilling the wort (I use a trashcan of ice and water and sump pump). Put the Immersion Chiller into the boil kettle at 15 minutes from the end of the boil. After your boil is finished, chill the boiled wort as quickly as possible.
11. Transfer the wort to your fermentation vessel (carboy, conical, etc) aerate and pitch your yeast.
12. Fill kettle with cleaning solution. Recirc through HLT1 for a CIP process. Wipe the kettle without scratching it.

5 comments
Comments feed for this article
February 15, 2008 at 11:58 pm
BuBBy
Very nice!
February 18, 2008 at 5:53 pm
Phil
Hey Rick, I’m happy to see you doing this. Really, I think it’s a brilliant thing. It’s an esoteric approach to blogging about brewing. And there is a religious connection to what we do – I’ve often felt that.
See, you’re learning so much more than I am lately. I feel stunted. I should get back to the books. I had no idea about altitude adjustments for hops. What do you do – guess? Keep me posted on the progress with this. I’m interested what the AAU adjustments are for altitude.
The whole barley wine thing – I’m intrigued by it. It seems like such a monumental project. One day, I’ll give it a go. But I think I want to live vicariously through a brewer like you first. Then you can give me pointers. 🙂 After you rack it a second time to secondary, and it’s finished it’s fermentation completely, do you add yeast to the beer before bottling? Seems after a tertiary transfer, there would be nothing left for priming sugar to help make CO2.
Again, great site Rick. I appreciate homebrewers like you who share the same love and passion for the craft of brewing that I have. And it comes through in the glass because your beers are always first class.
Keep the posts coming. I’ve bookmarked you, so I’ll be around.
April 16, 2008 at 6:53 pm
Jason
A 20 gallon kettle for $7000?? I think I’ll get a new kitchen.
April 16, 2008 at 10:13 pm
rhagerbaumer
Thats why I haven’t done this yet. Mucho Expensive. Plus the cost to bring 230V into the basement. I’m investing in lottery tickets, I’m sure that’s going to pay off any day now! 🙂 LOL
September 12, 2008 at 8:56 pm
rhagerbaumer
I’ve given up on doing this any reasonable time frame due to financial constraints. I have a new design and have the parts on order. I’ll update this page when I finalize it. I’m not entirely certain on one aspect of it.