Well, perhaps throwing your stir-plate away is a bit drastic. Recycle it in an earth friendly manner. No, keep it – you might still need it someday.
Personally, I’m pretty much done with mine. Actually, it’s my second stir-plate. The first, a modified computer fan, burned out. I had high hopes for the second one. It was pricey. It had a Pulse Width Modulated (PWM) speed controller. It had a catchy name. So why didn’t I like it?
One of my issues was the magnetic stir bar – is it rotating or off to the side flailing around? The starter is opaque, so you can’t see the bottom. Did it start up too fast and get thrown to the side? Shouldn’t there be a vortex? How much heat is the stir plate adding? These issues bugged me.
The next drawback is the 2L Erlenmeyer Flask. If you boil wort in it, you’re bound to have a nasty boil over – Fermcap S does help with this. I’ve also scorched my starter wort many times. Black flecks in the foam. Burnt odor and taste. To resolve this issue, I started boiling water in the flask to sterilize it, and boiling the starter wort in a separate 12qt kettle. Boil over solved, scorched wort problem – solved. There is a low level chance of contamination or hot side aeration while pouring the wort into the flask depending on whether you transfer hot or cold.
I was not very happy with the stir plate in general.
The final straw was when I found large clumps of yeast all over my kitchen counter. I was experimenting with a technique I had seen at a brew club meeting – using an aquarium air pump with a .5 micron stone in the flask on the stir plate. I turned on the pump and the stir plate and went to bed. In the morning, it was a huge mess and a huge waste of apparently healthy and happy yeast. Happy at least until they dove to their death on my counter top – like a bunch of Lemmings running off a cliff. It was time to take corrective action! It was time to find a replacement for the stir plate.
For whatever reason – eventually you will want to make a big starter, perhaps for a strong ale or a lager. My next smallest container at home is a 3 gallon carboy that I bought for making large “simple” starters. A simple starter is one that you try to remember to intermittently shake or swirl when you happen to walk by. You can make it less simple by squirting it with O2 or by adding an air pump and an aeration stone. These aren’t satisfying solutions – the rule that “a bad starter is worse than no starter” comes to mind frequently. Relaxing, not worrying, is very difficult without some amount of Zen training in the art of yeast propagation.
The Wyeast website provides this information “it is very important to increase your pitch rates according to the original gravity of your beer. A good rule to follow is a million cells per milliliter per degree plato.” And “Anytime you are pitching yeast into a harsh environment (high gravity, low temp) you need to add additional yeast. A rough rule of thumb is to double pitch rates above 1.065 and triple pitch rates above 1.085.”
The White Labs website provides similar advice. “While a starter is not always necessary, White Labs recommends making a starter if the Original Gravity is over 1.060, if the yeast is past its “Best Before” date, if you are pitching lager yeast at temperatures below 65°F, or if a faster start is desired.”
I’m a huge fan of the Jamil Zainasheff’s Mr. Malty® Yeast Pitching Rate Calculator™ and related podcasts. From the site, using a stir plate and a 2L starter, you can brew up to a 1.0856 OG beer. This is much stronger than what I usually make, but not always! I do make the occasional Barley Wine or Old Ale. These would exceed my 2L stir plate limit. I also tend to make the occasional lager over the 1.042 range, again exceeding my 2L stir plate capacity.
My initial thought for a stir plate replacement was to make an orbital shaker – like you find at your local hardware store for mixing paint, but a much gentler rocking motion. I think I saw one on the Discovery Channels “Brew Masters.”
While doing my typical research (I have OCD tendencies), I also found an article on the White Labs Inc. website. “The White Labs propagator with Frings aeration technology offers reduced propagation time, high cell density and dissolved oxygen contact.” This is a rotor-stator turbine system. Both of these systems, the shaker and stator, are beyond my ability to fabricate at home. They obviously have merit and I look forward to ambitious home brewers experimenting with them and submitting write ups!
I settled on a “Lab Mixer” design. This design involves a variable speed motor, a shaft and propeller and a sturdy base with vertical and horizontal adjustments. Apparently they are quite common in commercial environments, but I haven’t personally seen them in use in a home brew setting! Google Cole Parmer Lab Mixer for samples.
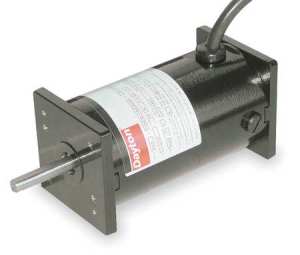
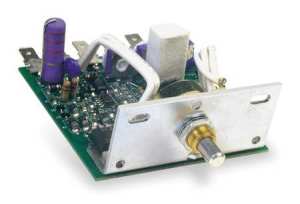
The main components of the system are the motor and speed controller.
| Radio Shack | Project Box | $4.99 |
| Grainger | Control, DC Speed 5JJ56 | $68.60 |
| Coupling, Rigid Steel | $6.69 | |
| Motor, 90VDC, TENV – 3XE22 | $131.55 |
The motor selection took me quite a bit of time. I wasn’t sure what speed to run a lab mixer at with a yeast starter. I bought and tried 93 RPM gear motor (Grainger Item 1LPW5). It was too slow to be effective.
The 3XE22 is rated for continuous duty, totally enclosed, not ventilated, permanent magnet DC motor with a 5/16” shaft diameter. Please note that motor manufacturers consider 8 hours continuous duty. Also, these are not brushless motors – brush and commutator maintenance will be required over time.
| Model | RPM | Torque IN/LBS | HP | F/L Amps | Volts DC | L1 | L2 | C |
| 3XE22 | 1800 | 1.3 | 1/27 | 0.46 | 90 | 4.68 | 4.93 | 6.43 |
The speed controller is a Dart 15DV1A controller, which handles 120V input and provides 90VDC output. It has a 25:1 speed rating, 1/50 to 1/3 HP, 2 Amps maximum current.
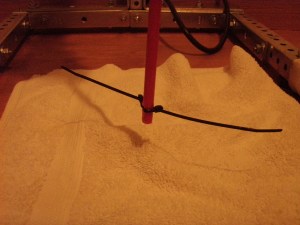
Now that I had the motor and speed controller selected, it was time to get a shaft for the mixer. A cheap fiber-glass rod from Home Depot fit the bill (orange drive way marker). When cutting the rod to size make sure you watch out for splinters! Next, I drilled a small hole in near the bottom. Two lock ties form the “propeller”. I actually tried multiple rods and shafts and this is the best arrangement I could find for this application.
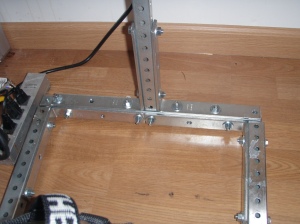
The “base” was a challenge to piece together. If you have a friend that can do some tack welding, you can save a lot of money. My base is made from square perforated steel bars, bolted together with 8” corner braces. The 1” x 3’ and 1- ¼” x 3’ (cut) perforated steel bars give me vertical and horizontal telescoping ability. I added adjustable feet and rubber stoppers to guard the sharp edges. All told, the stand was half the price of the entire project. It is sturdy and multipurpose though – so if I want to use the system as a mash mixer or to whirl pool the wort in the kettle, I can (and have already done so!)
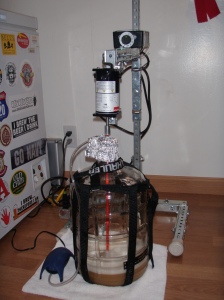
Looking at the pictures below, I’m using a 3 gallon glass carboy to mix a 2L starter. Note the air pump – this is in place to create a positive air pressure inside the container (keeps the airborne bugs out). A starter of 3L or 4L is well within the capacity. I may move to a 5L Erlenmeyer flask so it can be sterilized lacking the ability to autoclave my 3G glass carboy. A friend notes that he has broken two of the 5L flasks, so care is required when handling them. He also points out that sterilizing the carboy should be sufficient, which is confirmed on the MrMalty.com website.
After the research, cost and work – I’m convinced that buying multiple packets or tubes of Yeast is probably the best bet for most home brewers. You can buy a lot of pitches for the cost of stir plates, flasks, oxygen, aeration stones, air pumps and in my case – building a lab mixer. My joy comes from solving challenges, so the project was rewarding. Watching my yeast start off with short lag times and finish quickly with high attenuation rates is also a great reward for me – and for the consumers of my beer!
The lab mixer with a 2.0 L starter. The air pump keeps a positive air pressure inside the container so that air is flowing out, instead of in.
The base. If you can tack weld, you can save a lot of money on nuts, bolts and corner braces.
The lock ties actually provide plenty of impulse for stirring.
Sample calculations for a 1.066 OG.
1000 mL = 1 L, 1 gallon = 3785.412 milliliters, 5 gallons = 18927.06 milliliters = 18.92706 L
1 Billion = 1000 Million. 1 Million = 10^6 = 1,000,000.
1.066 OG = approximately 16.06 Plato
1 M Cells / mL / ° Plato * 18927.06 mL / 16.06 ° Plato = 305,140,000,000 = 305 Billion
1 liter starter = about 150 billion cells
2 liter starter = about 200 billion cells
1 tube or pouch (100 billion) pitched into 4 liter starter = 400 billion cells
Please note that White Labs warns against starters over 400 billion cells for a 5 G batch – “more cells are not detrimental until about 400 billion cells.” They also note that “One thing that contributes to flavor contribution in beer is yeast growth. If less yeast is pitched into beer, more yeast growth takes place, so more flavor compounds such as esters are produced.”
Jamil uses the George Fix values 0.75 billion cells for each point of gravity for an ale and 1.5 billion for a lager, so these simple calculations won’t match what you see on MrMalty.com.

18 comments
Comments feed for this article
April 14, 2011 at 5:36 am
Throw Your Stir Plate Away! « Epiphany Brewing ™
[…] Read the article here. […]
April 14, 2011 at 1:26 pm
Craig Belanger
Rick,
You need to be teaching a Science class somewhere!!! If my teacher was as cool as you (or showed practical applications that related to brewing beer) I would have paid more attention!!!
Keep brewing,
Craig Belanger
Brew Bubbas
April 15, 2011 at 4:29 am
Rick
Standing on the shoulders of giants my friend!
December 29, 2012 at 7:12 pm
FatSean
You need to match your stirbar to the magnet distance on the plate and you don’t need a funnel in there, just a tiny dimple.
If cost is an issue, just propagate your yeast. You have an autoclave and you don’t yeast ranch?!
December 29, 2012 at 8:13 pm
rhagerbaumer
Thanks for the note. No, I don’t have an autoclave or a yeast store. I should though, given the looming zombie apocalypse or fiscal meltdown.
January 6, 2013 at 3:05 am
Wilbuer Jones
Sorry…that setup is ridiculous. The cost per bottle of beer is now what? Keep it simple…
January 6, 2013 at 4:34 am
rhagerbaumer
Hmm. I don’t bottle. Actually, I don’t drink that much beer anymore, so it’s particularly irrelevant. I like gadgets. For most folks I strongly recommend buying pouches or vials of yeast. I can share that my brew stand is over $2000 (lots of cost creep), and I have a conditioning freezer, and a serving freezer (keezer) with all the kegging equipment. Sooooo… I never got into brewing to save money. 🙂
February 17, 2013 at 5:39 pm
kruski
Great post Rick, I am in a similar situation where my 2L E.flask and DIY stir plate (works well w/ no issues of bar flinging off) is not capable of handling 10G high gravity batches.
I am now browsing the rest of the site to see what other interesting experiments you have done.
June 1, 2013 at 2:56 am
Todd
Or, you could do like I do… start 2x 2L E-Flasks with a stir plate. Sometimes a few days ahead, so I can dump and re-add another DME solution to the yeast. A second flask, alternate the stir plate for a day or two is a cheap route.
October 13, 2014 at 1:55 am
Josh Palmer
you sir, are a fucking idiot. Over filling, using a micron stone on a stirplate? that defeats the purpose you moron.
October 13, 2014 at 11:30 pm
rhagerbaumer
No doubt I am a f*cking idiot at times. The stone was at the end of an aquarium pump, so it was not pumping full O2. Like I said in the article, I was just following what was demonstrated at our homebrew club meeting for propagating yeast up. I hope ‘poopfuckingcunt’ is not your real email address or I would suggest you have some serious issues of your own. Thanks for adding a real comment though. I hate just cleaning out spam bots all the time.
May 8, 2015 at 5:05 pm
densest
This may be a bit late but… my stir plate & bar work perfectly well with a 1 gallon All-clad pot. Or any non-magnetic metal, glass, or ceramic pot that isn’t too thick. Flasks are convenient in some ways, but frothing anything more than (say) 1/2 liter in a 2 liter flask will come out the top. I am using lab surplus stir plate & bar, so YMMV.
May 8, 2015 at 5:09 pm
rhagerbaumer
YMMV? Actually I like this input – I never thought about using other non-magnetic metal. It would certainly save tons of money. Maybe you could make an enhanced variable speed controller to drive the bar. What is the core in your all-clad pot? Aluminum?
May 14, 2015 at 7:43 pm
Chris
I’m sorry you didn’t have success with your stir plate. As a home brewer I understand our desire to tinker, so I can appreciate what you built instead, but I definitely think it was huge overkill. I think you should give the stir plate another try.
A few thoughts from your post:
I use a vortex 2.0 stir plate from norther brewer. At $99 even this is an overpriced solution, but I love the way it looks and I had a little extra disposable income at the time.
I upgrade the 1″ stir bar to a 2″ for a few bucks on eBay. I, also, wanted to SEE the vortex so I knew it was working. I’ve never had any issues with it, and the few issues I read online were quickly replaced by northern brewer.
Dont boil inside the Erlenmeyer. While this is supposed to work, I think everyone I know that has tried it has had boilovers. Maybe this is better suited for a lab environment or something, but I just boil in a small kettle on my stove and use a sanitized funnel to transfer to my sanitized Erlenmeyer and then cool.
Your aquarium pump idea was overkill, and a pump should be paired with a 2 micron stone, not a .5. .5 is to be used with an O2 tank and regulator.
As far as pitching 2 vials vs 1, a few more thoughts. Pitching rates are so important to the quality of the product you want to produce. IF, a single vial carries 100b VIABLE cells, even 2 only puts you at 200b. I’m constantly using my stir plate to start with 1 vial and create starters with 200-350b active, viable cells, depending on what the starting gravity calls for. Instead of a single $9 vial you would might to spend $18-36. Under pitching causes the yeast spend more time in the growth phase and there is more off flavor development here as well as overall time wasted and chance for other competing bacteria and wild yeast to grow before active fermentation begins. So if you look at the cost of the $99 stir plate, it is paid off very quickly compared to buying 2-4 vials per batch. Overpitching isn’t as big of an issue as far as off flavor goes, but if you’re washing and reusing your yeast you will not get 5-10 generations from them because they just aren’t strong enough.
Finally the stir plate and starter allows you to pitch yeast when they are in an active state. Hungry yeast into your wort will help you achieve the goal of 12-15 hours of lag time prior to active fermentation, which is proven to give you the best possible flavor and aroma creating while being ready to attenuate down to your final gravity.
Great post, but give the stir plate another chance!! Keep on brewing and keeping the conversation going!
Chris
May 14, 2015 at 8:04 pm
rhagerbaumer
Great info! Thanks.
June 14, 2015 at 9:10 pm
Charles Young
I’m sure I’m late to the comment party, but I figured I’d go ahead and leave one. First, I admire one for solving your problem(s).
The first stir plate you made sounds like it threw the stir bar quite a lot. I spent a few months making different prototypes of stir plates and following people’s advice. If you do it right, it should never throw a bar. I have a 2 in bar and it won’t throw if I crank the speed from 0 to max. A variable speed controller makes a much better controller than simply dropping voltage with a potentiometer. Secondly, if the magnets are very close to your fan, it is a short matter of time before the rotating magnetic fields tear the fan to shreds. I put a PVC pipe on the fan and then mount a washer with magnets on that. Harder to get in the right position, but mind’s lasted through many brews. Still, if your past solution is still working, I would just stick with it. I’d be willing to guess your second stir plate was of low quality(maybe not cheap though). Email me if you want instructions for my build. I posted them on homebrew talk somewhere.
January 12, 2017 at 3:23 pm
Dave
Hi,
I just found your article as I was looking for a build option to stir at least a 1 gallon jug. You’ve done some great work here, thanks for sharing. I have a question about the air pump and positive pressure being used to keep things out. I assume that pump draws ambient air from around it, so is there some type of HEPA filter on it to keep the source air clean?
Thanks
January 12, 2017 at 5:03 pm
rhagerbaumer
Thanks for the comment. This page has been pretty stagnant for some time as I haven’t brewed in a few years.
Yes, you have it right – Positive Air Pressure is meant to keep airborne contamination out of the carboy or Erlenmeyer Flask as you choose. Along the same line of reasoning as having a clean room when working with yeast. You would want a HEPA filter on the air being pumped into the container.
Honestly, in practice I just loosely covered the opening with aluminum and never had an issue with contamination.