
You are currently browsing the category archive for the ‘Brewery Information’ category.
Kettle Shopping
I’ve been shopping kettles recently – actually I’m in the process of a brewery upgrade. I already have a really great kettle for boiling – a 15 gallon stainless steel Megapot. The marketing spiel on the Northern Brewer site describes it like this –
Northern Brewer’s famous Megapots are a homebrewing standard. These are high quality Stainless Steel kettles with a thick three layer bottom – an aluminum layer is sandwiched between two stainless steel layers for superior heat dissipation. This protects against scorching and hot spots when heating a mash or boiling wort. The 15 Gallon pot is 15″ tall and 19″ in diameter. Wall thickness is 1.2 mm.
It’s great. I couldn’t be happier. It’s very wide which is perfect for boiling off volume and the width makes it very stable on the burner (which is an important feature with scalding hot liquids!) It doesn’t retain heat well thought. There is too much exposed surface area. I’m looking for other options for a mashtun/lautertun application.
I looked at the Blichmann BoilerMaker™. They have a great website – lots and lots of sizing and volume information. One of the notes is “the height to diameter ratio is the ideal 1.2 to minimize boil-off and also prevent boil-overs.” Which is an interesting point, but I’m not looking for a boil kettle.
For a mashtun, my Rubbermaid “Gott” coolers have served me well for years. I have come to appreciate the height-width ratio and their ability to retain heat. This started me looking for a kettle that was taller than wide for my mashtun. The main reason I didn’t buy the BoilerMaker™ is this comment from their website… “While the clad bottoms look impressive, they add cost, but no real benefit to the brewer.” I call B.S. on that one – I know for a fact if you are adding direct heat to a kettle without a clad bottom you get hot spots and localized scorching. The tri-clad bottom is important to me.
After kettle geometry, the next important factor is the metal the kettle is made from. I won’t go into a discussion on the suitability of aluminum kettles, just suffice it to say I won’t use one. Call it a personal preference. Stainless steel resists corrosion, is passive and can be cleaned with all the caustics or oxygenated cleaners you want.
Regarding tri-clad (tri-ply) bottoms, it turns out there are several types of wafers used in different kettles – from copper to aluminum to iron core. A quick reference of “thermal conductivity” ratings (measured in Watts per Kelvin Meter) for different metals shows one of the worst heat conductors is Stainless Steel, followed closely by Carbon Steel. Copper, not surprisingly, is the best by far.
Copper: 401 W/m*K
Aluminum: 237 W/m*K
Cast Iron: 80 W/m*K
Carbon steel: 51 W/m*K
Stainless steel: 16 W/m*K
There are some ratings for stainless steel that you will see if you go shopping online. You might see a rating of 304 SS. This refers to the alloys and additives used in the steel – 304 contains 18% chromium and 8% nickel. 316 contain’s 16% chromium, 10% nickel and 2% molybdenum. The “moly” is added to help resist corrosion to chlorides. Similarly, if you see 18/8, the first number is the amount of chromium that is contained in the stainless – 18% chromium, 8% nickel. 18/10 is 18% chromium and 10% nickel. The higher the numbers, the more corrosion resistant the material.
You will also see mm, inch and gauge ratings. These all refer to the thickness. Thinner kettles heat quicker and are easier to move and clean. Thicker kettles maintain heat, distribute heat more evenly and are more durable. It’s a matter of preference and the intended application.
gauge inches mm
16 0.063 1.6002
18 0.050 1.27
20 0.038 0.9652
I’m still looking for the perfect kettle. I think the best I can do in the 50-60qt range with a tri-clad bottom is equal height/width. A word of warning – if you’re buying online, watch out for restocking fees. Vollrath wants a 25% restocking fee! And you have to pay for return shipping. It’s an unexpected hidden hazard of online shopping.
Update – the kettle(s) I settled on are as follows:
Vollrath 47725 Intrigue 53 qt. Stock Pot.
Thanks to its 18-8 stainless steel construction and 1/4″ thick stainless steel clad aluminum base, this Vollrath 47725 Intrigue 53 qt. stock pot heats evenly and can stand up to years of heavy use.
A stock pot’s tall, narrow profile also helps preserve liquids longer and forces them to bubble up through the ingredients in the pot, maximizing flavor transfer. The Vollrath Intrigue stainless steel induction 53 qt. stock pot is NSF Listed, and oven and dishwasher safe. See Companion Items for a compatible cover.
Dimensions:
Inside Diameter: 15 5/8″
Inside Depth: 15 5/8″
Gauge: 16
Vollrath 47778 Intrigue 15 23/32″ Stainless Steel Cover with Loop Handle
This Vollrath 47778 Intrigue 15 23/32″ stainless steel pot / pan cover features a satin finished outside, and a mirror polished interior. A durable welded loop handle is comfortable to grasp and enables easy hanging. NSF Listed. See Companion Items for Intrigue cookware that this cover fits.
Dimensions:
Nominal Diameter: 15 23/32″
Gauge: 16
I’ve upgraded my brewing equipment significantly during the year. Attached are photos of my current setup, from the mundane to the sweet!

Cold Smoker for home smoked malts

2L Yeast Starter on Stir Plate

1 Bucket each of StarSan and PBW solution for every brew day

ProMash brewing software

Scale, O2, StarSan spray, 5.2 Buffer, 1 gallon measure, etc...

March 809 HS Pump, Sanitary tri-clamps, 3 pc Blichmann ball valve

Sump pump for immersion wort chiller

Motorized JSP Malt Mill

Lautertun, Hot Liquor Tank and Charcoal water filter

15G Megapot with thermometer and 3 pc ball valve

Kettle top view

Natural Gas Burner

Natural Gas Quick disconnect piped to the garage.
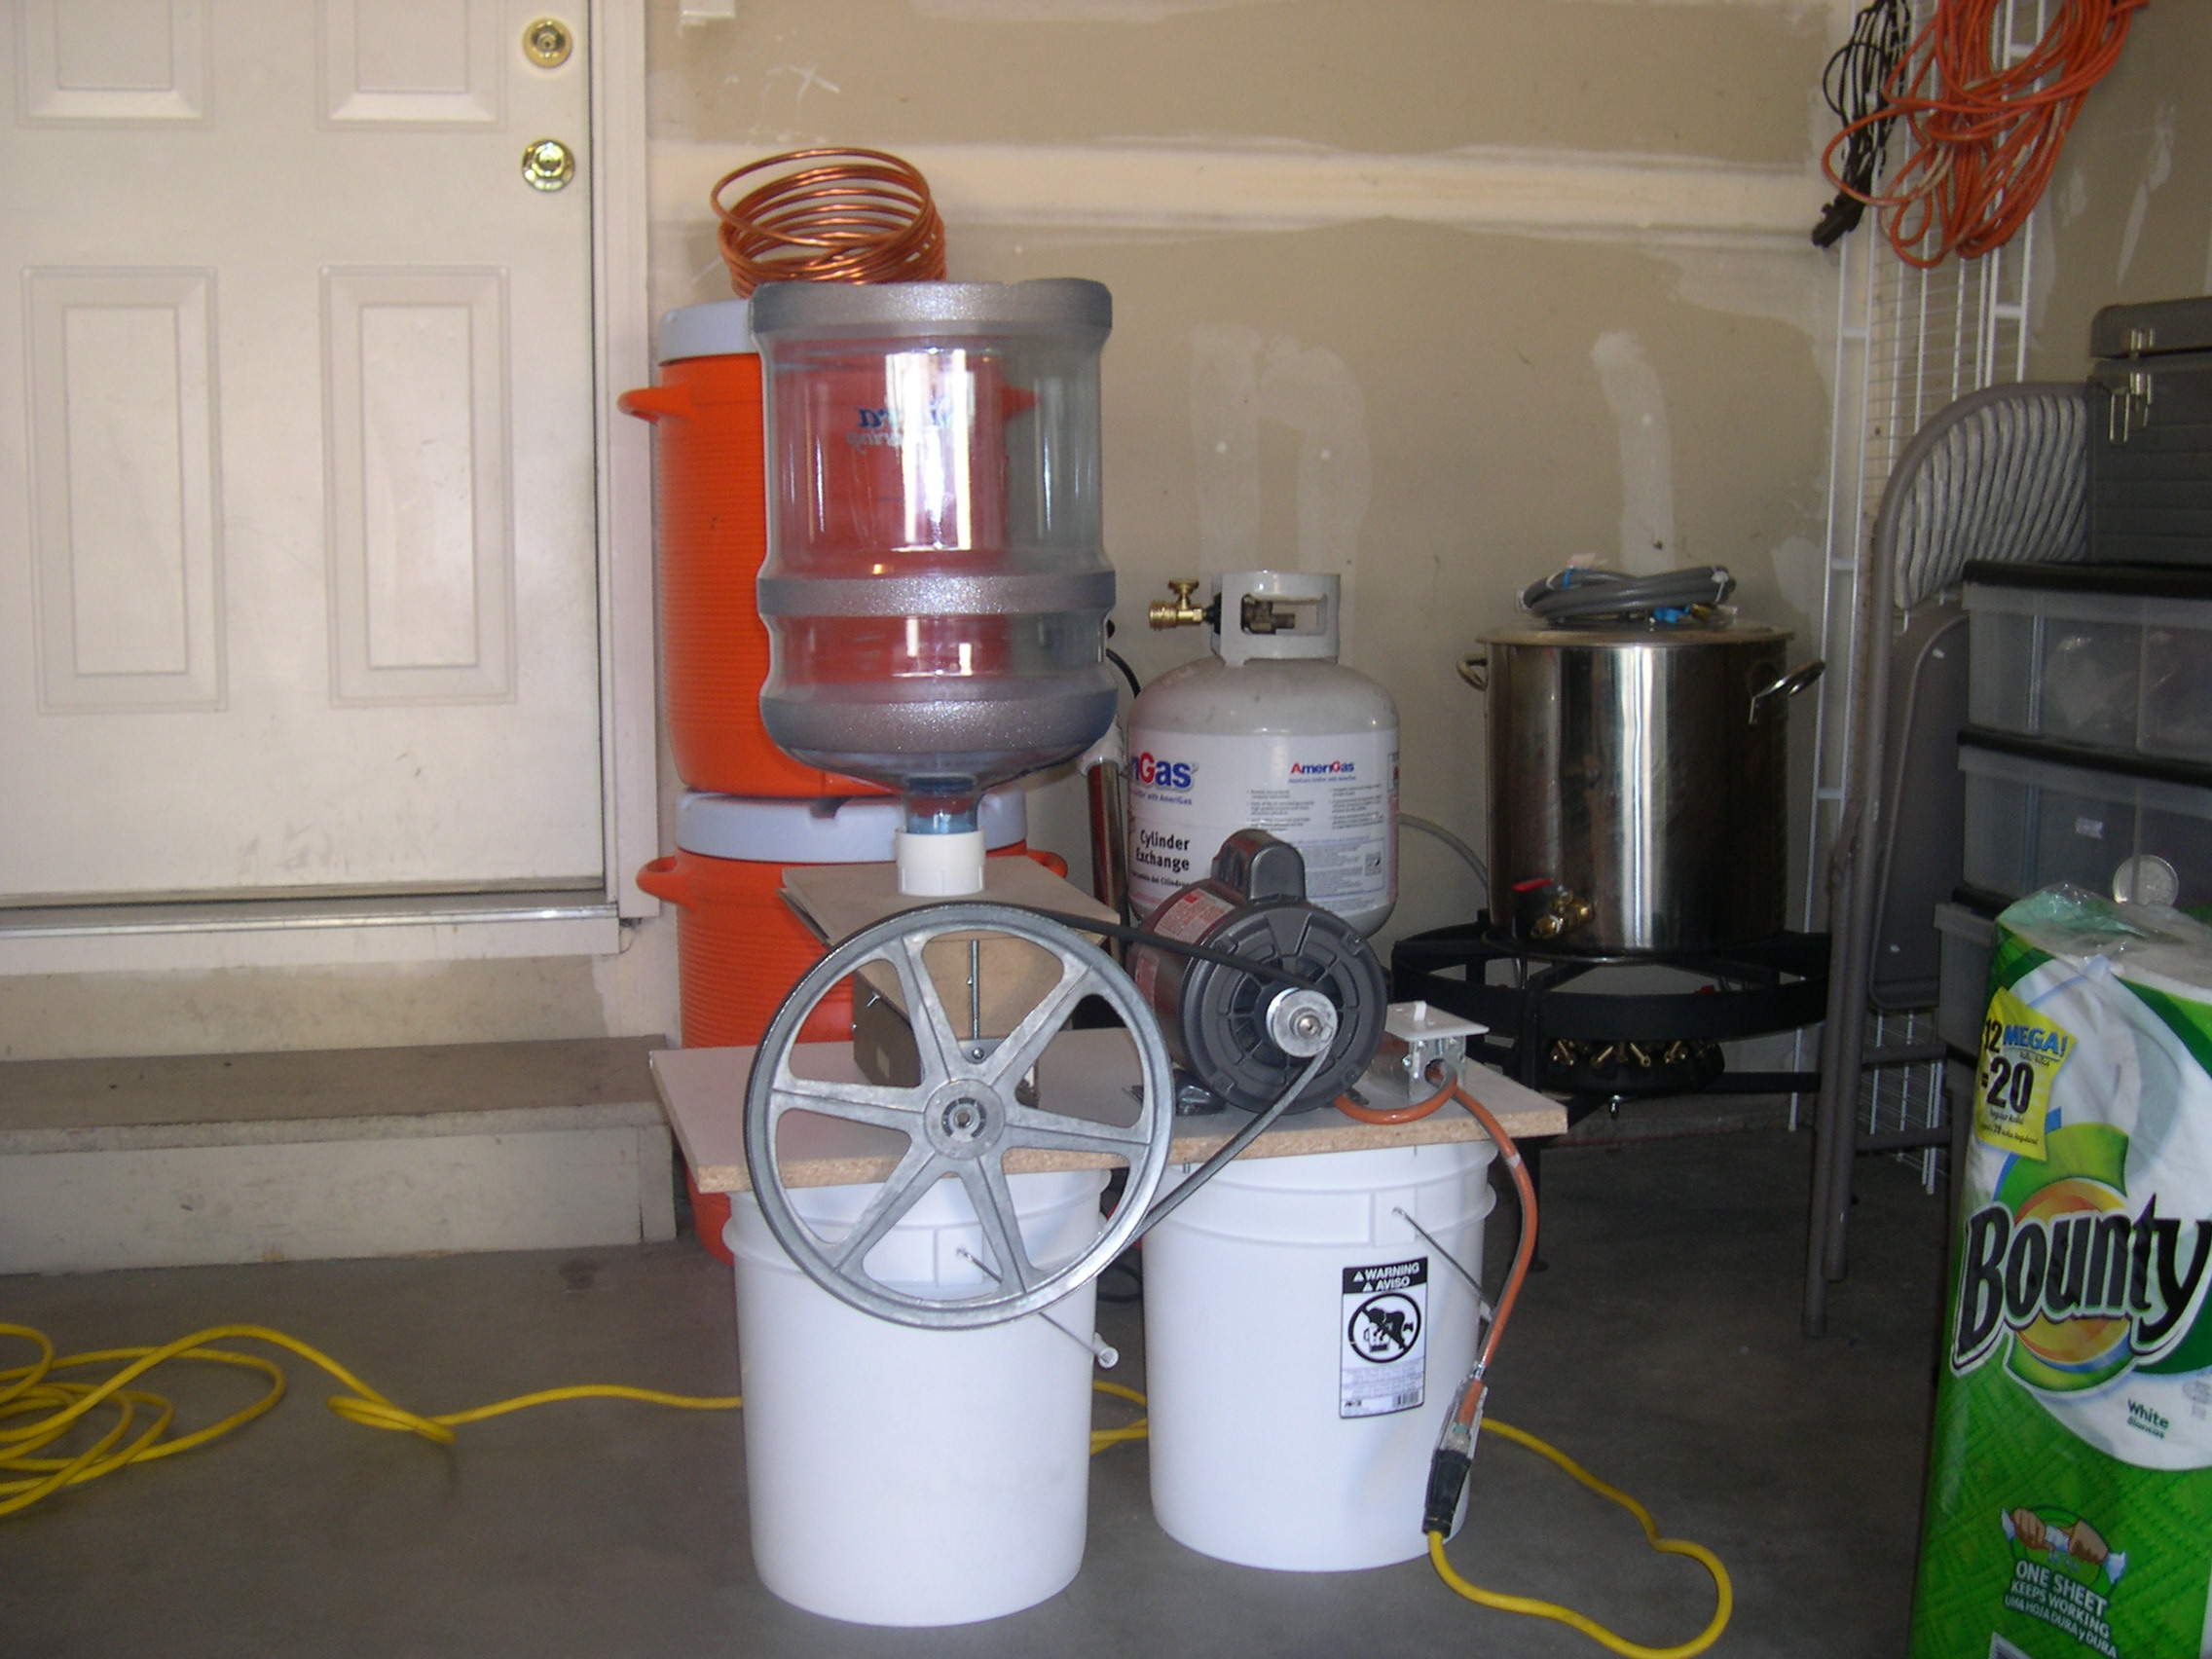
Things to drool over. My brewery upgrade project is mostly finished. I found a motor on CraigsList.com for $15.00 and I found a local Grainger distributor in Boulder so everything fell into place just as my MaltMill arrived in the mail (see previous post for the pro’s and con’s of different MaltMills I looked at.)
Here’s a quick shopping list for this project:
| Dayton 1/2 HP motor, 1725 RPM, 115/230V, 1/3 phase, 5/8″ shaft. New in box. | CraigsList.com | $15.00 |
| Fixed bore sheave, spoked, single groove, bore 1/2″, outside diameter 12″, 3L belt pitch diameter 11.55″, 4L belt pitch diameter 11.85″, keyway, die cast (Zamak #3) | Grainger item 3X938 | $27.15 |
| Fixed bore sheave, solid, single groove, bore diameter 5/8″, outside diameter 2″, 3L belt pitch diameter 1.55″, 4L belt pitch diameter 1.85″, keyway, die cast (Zamak #3) | Grainger item 3X896 | $4.18 |
| Bushing, Reducer, Pk3 (1/2″ to 3/8″) | Grainger item 4X664 | $4.93 |
| V belt, 4L, 1/2 x 45″ | Grainger item 4L450 | $6.09 |
| 2 x 5 Gallon Buckets | Home Depot | $12.94 |
| Switch Box | Home Depot | $1.85 |
| 120v 20A light switch | Home Depot | $4.18 |
| Wall Plate | Home Depot | $2.99 |
| 25′ 12 gauge extension cord | Home Depot | $26.72 |
| 48″x15″x1/4″ white board | Home Depot | $6.75 |
| 5 gallon bottled water (used for hopper) | Home Depot | $11.99 |
| 2″ male/female PVC connectors, various nuts, bolts, washers | Home Depot | $10.00 |
This photo shows the final setup. The adjustable JSP MaltMill mounted on the left with a 12″ Sheave, the 1/2 hp motor on the right with a 2″ Sheave. The large hopper adapter is bolted to the mill with the 2″ PVC male/female connecters screwed together sandwiching the board. The upside down 5 gallon water bottle with the bottom sawed off forms the hopper. I had to cut the lip off the bottle and cut it vertically to get it to fit. Next time I’ll find some PVC connectors so the bottle will slide in without being cut down. The light switch is on the far right. I used a 20 amp switch to handle the larger load. I also used 12 gauge wire. The light switch has a male plug and a female plug connected to it. You plug it into an extension cord on one end and plug in the motor on the other end. I also made the motor unpluggable so it could be taken off or swapped out without having to rewire the recepticle.
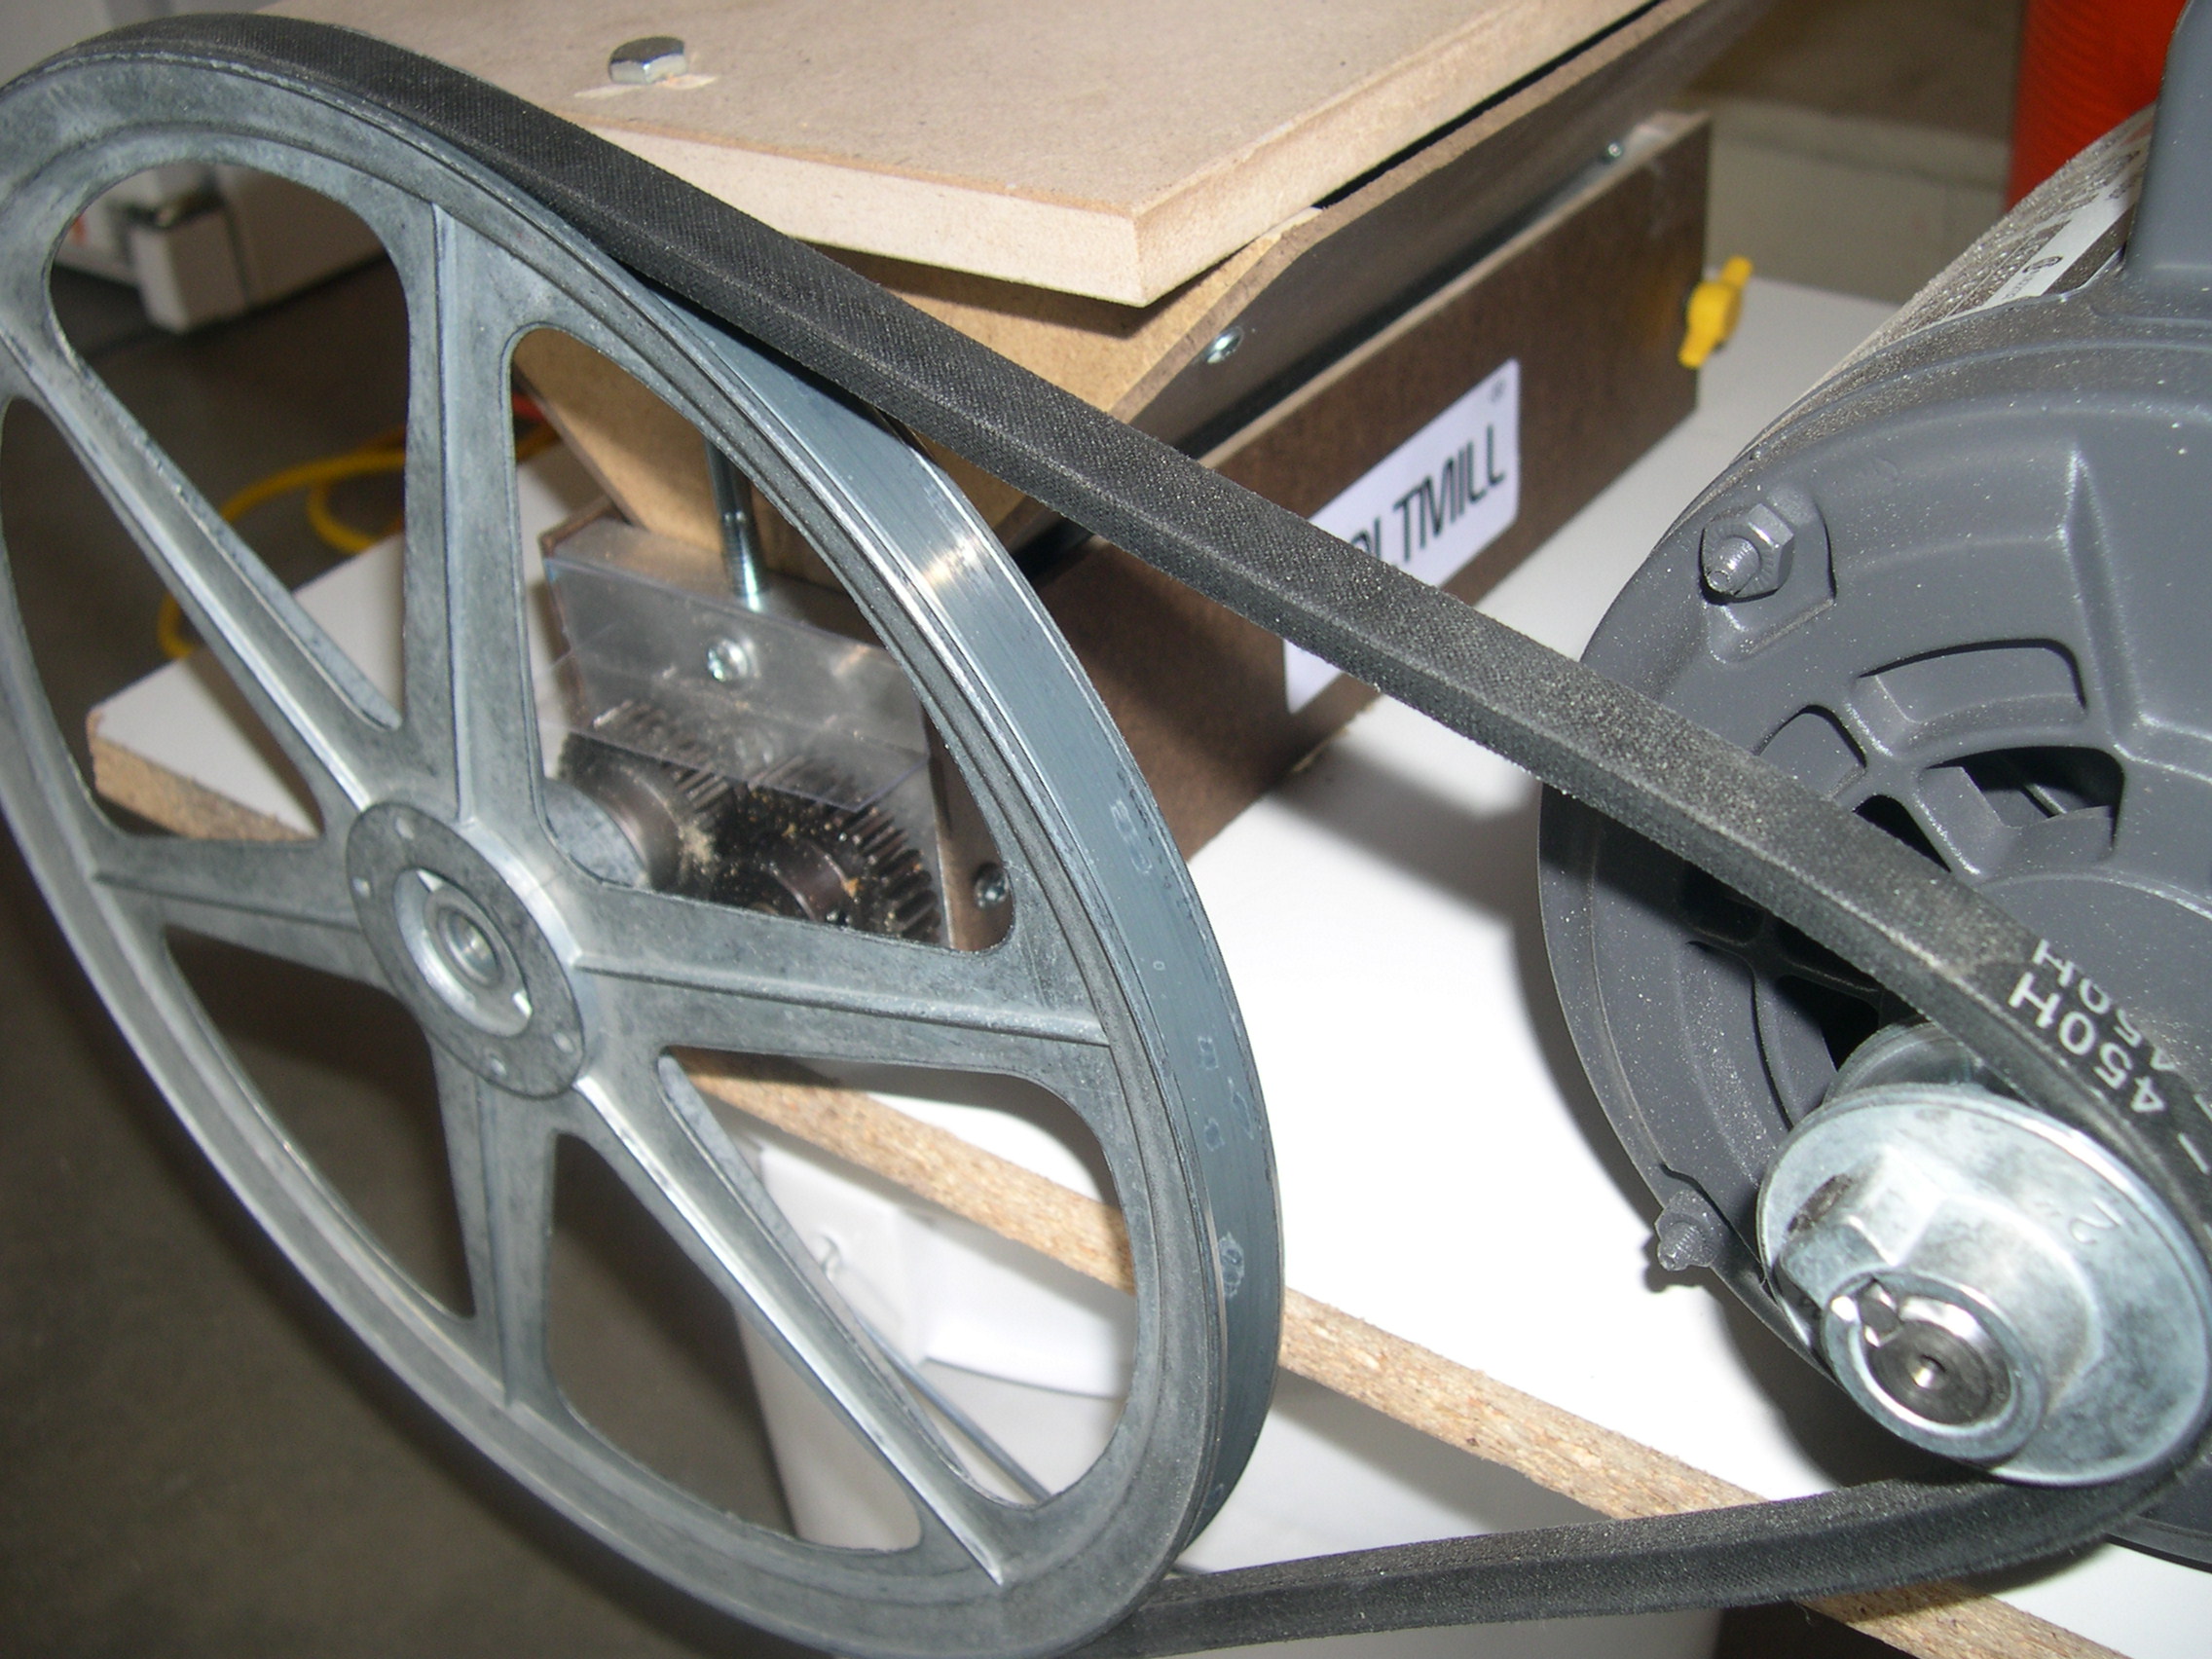
This picture shows the Gear Driven Option pretty well. Both rollers are case hardned. The gears have different numbers of teeth, so they rotate at different speeds. The belt reduction should cause them to rotate at 1.85″/11.85″ * 1725 RPM = 269 RPM. Which was my goal – not to fling the grain through the mill, but actually give it a good crush.
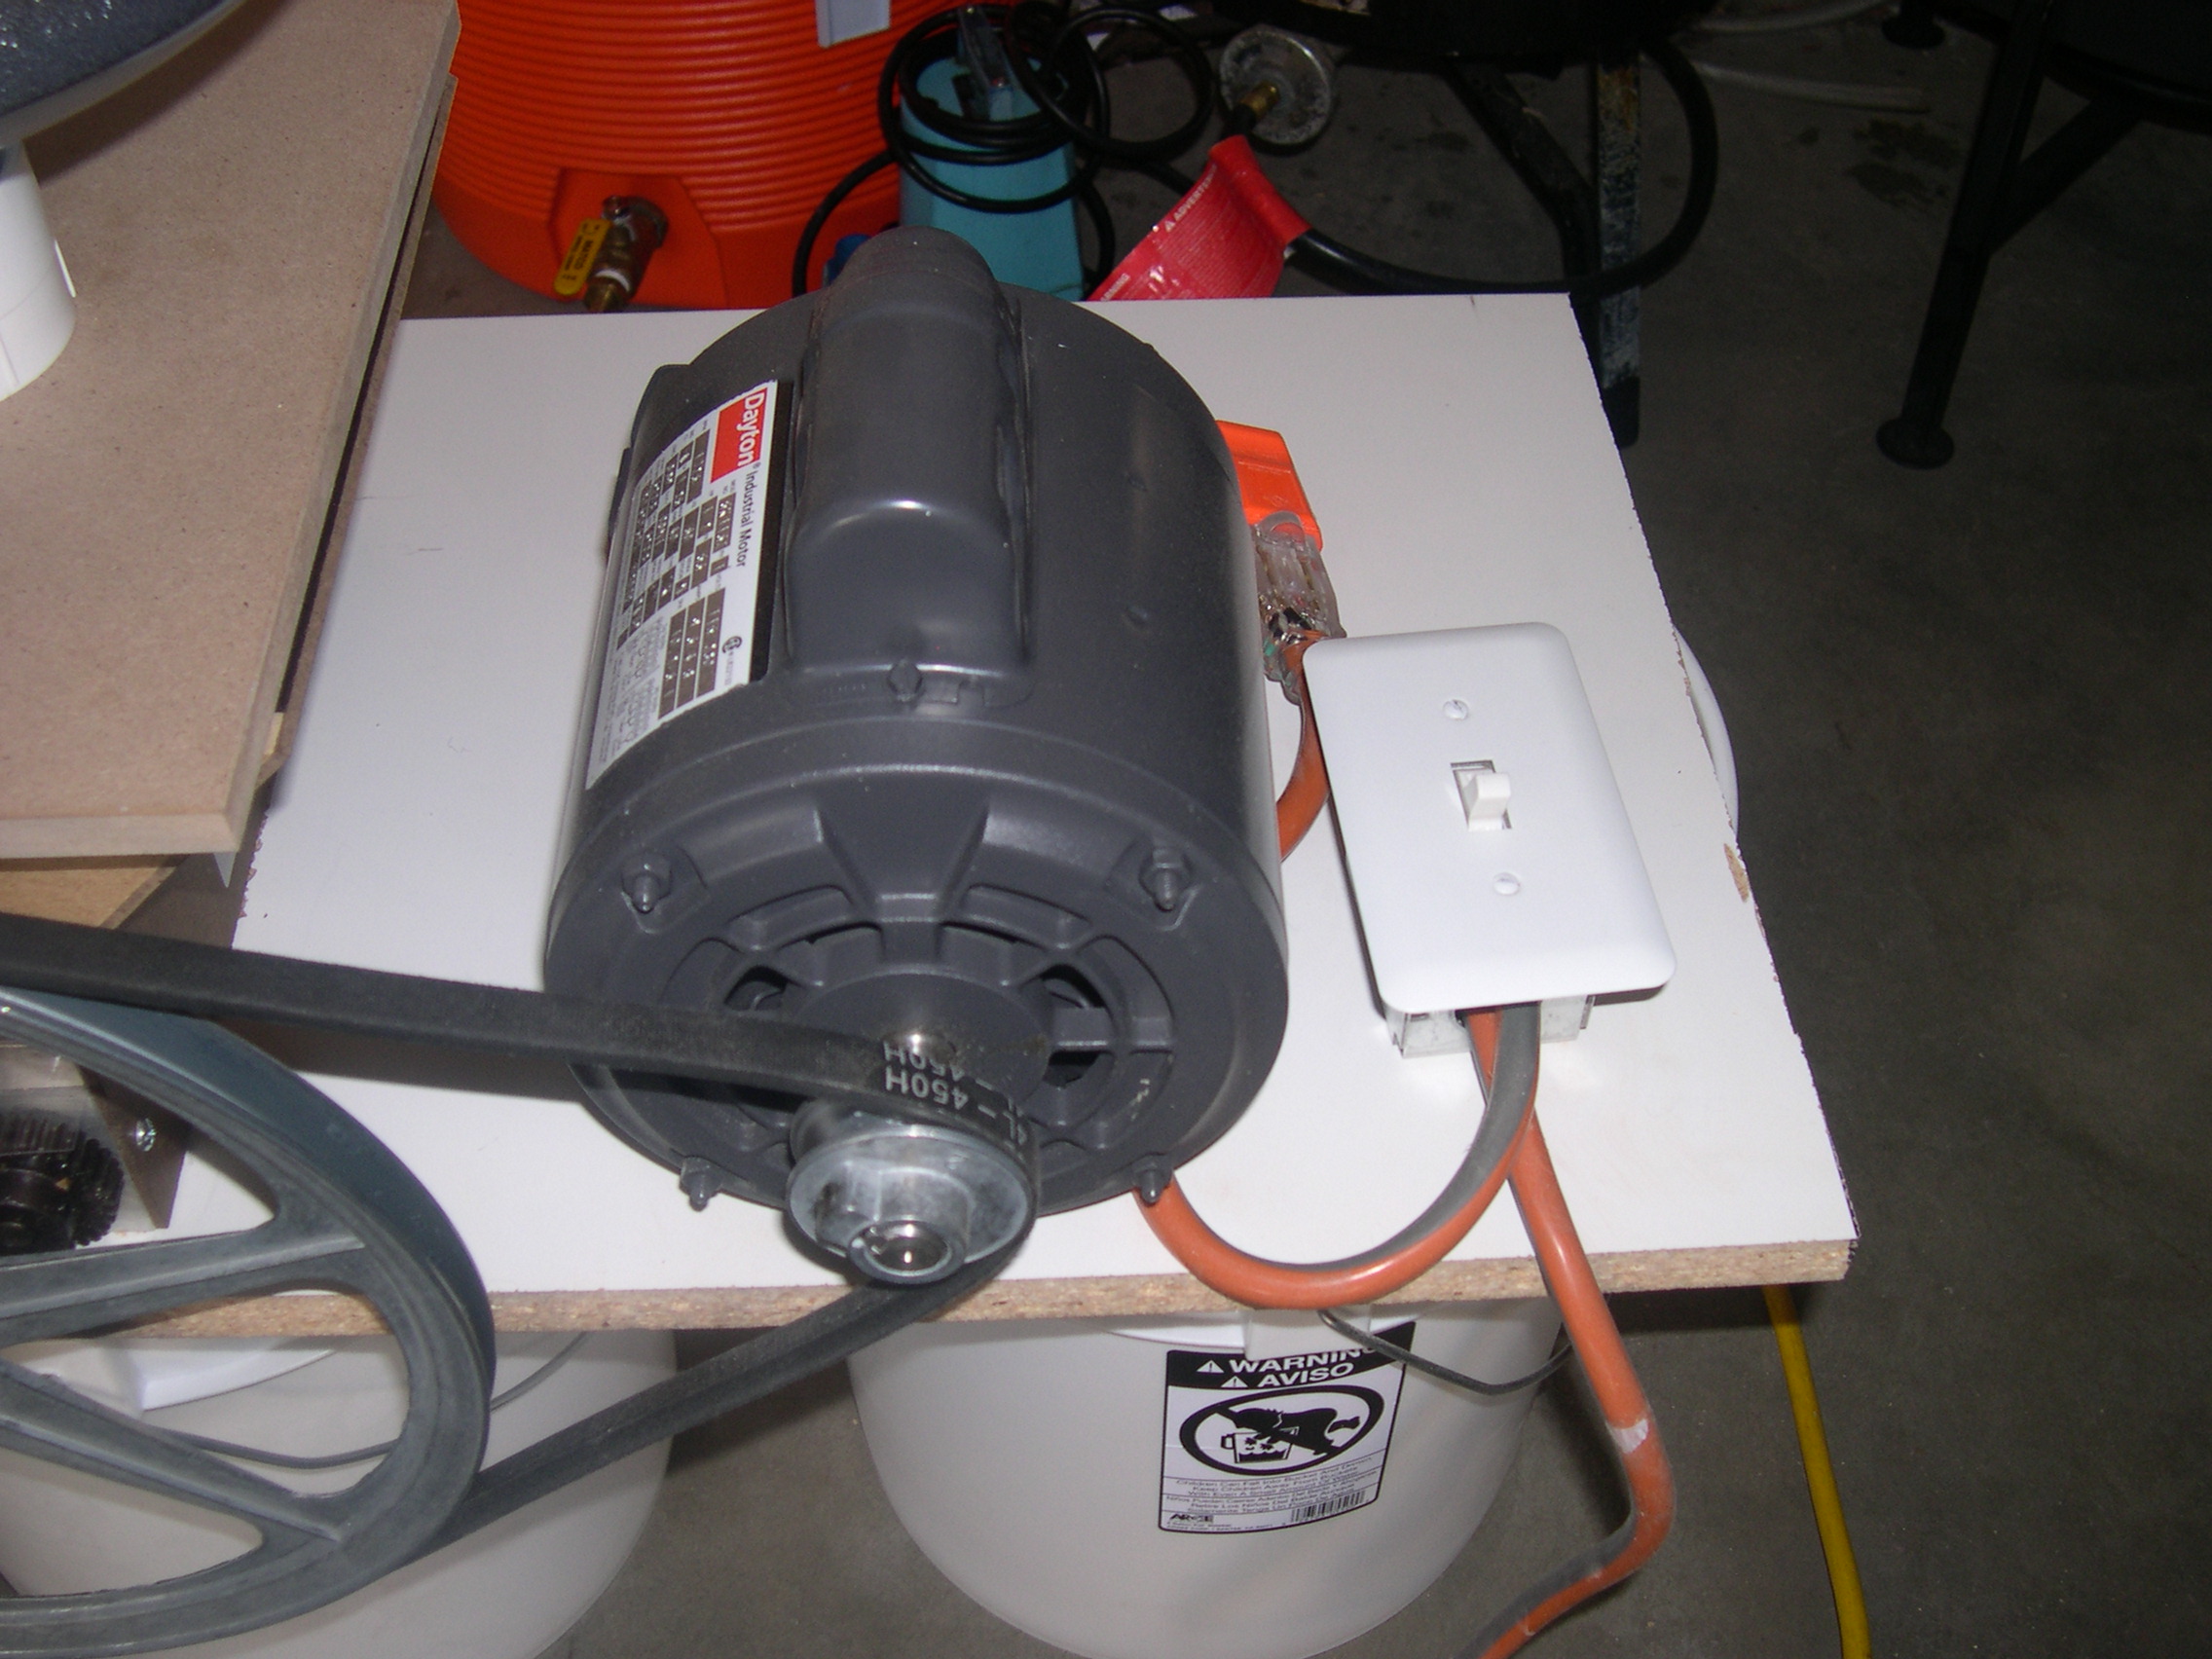
This is a picture of the light switch, plugs and motor.
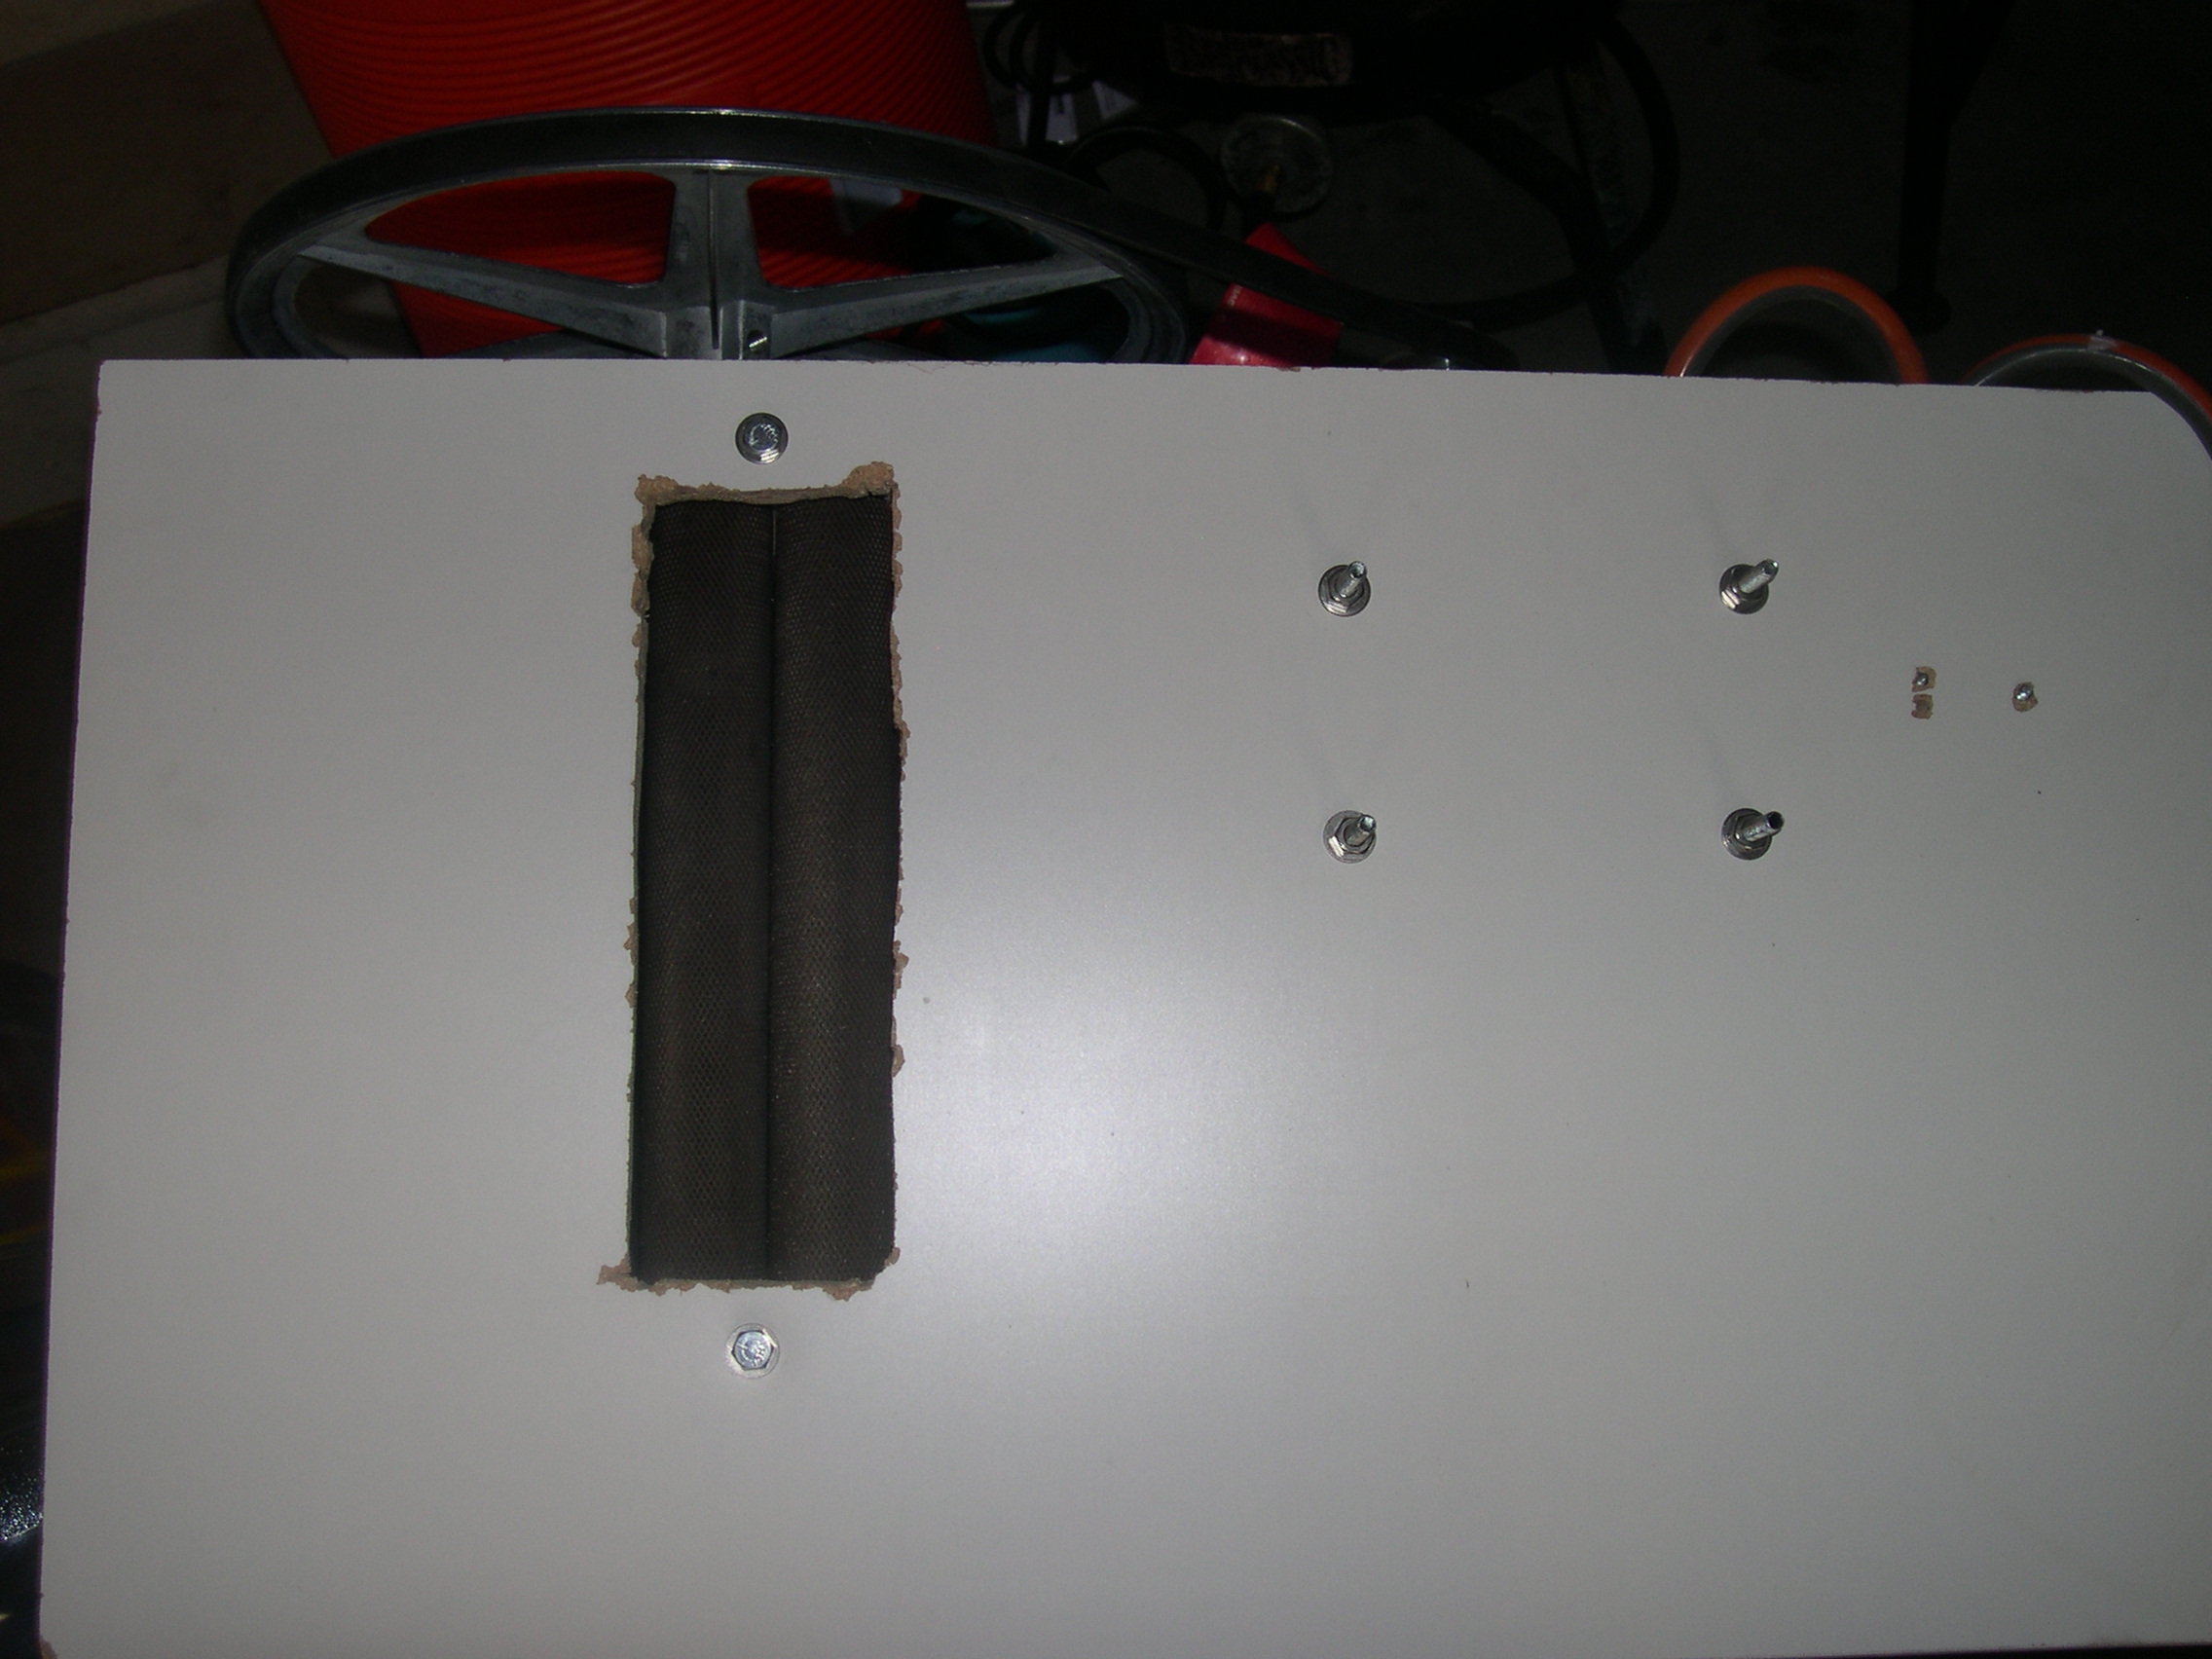
This is the bottom of the board. Note the suck ass cutting. I’m not too good with a rip saw. C’est la vie. Good view of the rollers from the bottom.
All thats left is to cover the belt and sheaves so I don’t cut my fingers off!
I decided to put a small capital investment into the brewery this week. I’ve been concerned about my mash efficiency for some time now. I’ve been getting my grains crushed from the online brew stores at who knows what setting. When I go to the LHBS (Local Home Brew Shop for you n00bs) I’m concerned at the cleanliness and the fact that who knows what grains are getting mixed in with mine. There is always a lot of flour dust floating around. I also didn’t like the fact that my crushed grains could sit around for up to 2-3 weeks during shipping and while waiting for my brew day. I was also restricted from buying grain in bulk because I wasn’t able to crush the grains at home.
Okay, obvious reasons with an obvious solution – buy a malt mill.
I did research on the topic in my OCD manner.
Here’s the mill I want, thanks to a mention from TiMX on the BeerTribe.com forum -> “The MashMaster MillMaster“. Note that is is adjustable on both ends, has large diameter case hardened rollers, is rust free and both rollers are gear driven. Unfortunately it’s manufactured in Australia and minimally costs $119.00 to ship if you’re willing to wait 2-3 months! You can get it faster if you’re willing to pay $204, $287, $346 or $423 in SHIPPING COSTS! Okay, maybe next time. It’s a beautifully designed grain mill.
The mill I settled on is the Schmidling Malt Mill for several reasons. It has a nice long roller (10″ long, 1 1/2″ diameter, the largest in the home-brew industry). The exact model I got has the following options:
-
MaltMill, Model A $143.00
-
Gear Driven Option $50.00
-
Large Hopper Adapter $29.00
-
Case Hardened Roller $30.00
-
Shipping and Handling $18.00
Total with Taxes: $270.00.
Okay, so that was a little pricey!! I really wanted the stainless steel rollers, but couldn’t see how you order them. They were mentioned in the descriptor page. So, what are the features of this malt mill?
The MALTMILL will process a pound of grain in less than 15 seconds and enough for a five gallon batch in under five minutes with the hand crank. When motorized, it can crush at a rate in excess of 1000 lbs per hour. At 400 RPM, it takes 3.3 seconds to crush one pound. It is designed to sit on top of a bucket or mash tun so that the milled product falls in and any dust created is contained. It can also be bolted or clamped to a work table for more stable or permanent operation.
The MALTMILL is provided with a nominal spacing of .045″ between the rollers. This produces an excellent crush on all commonly used malt. An adjustable version is available for those who perceive the need for additional flexibility . The roller journals ride in oil-impregnated bronze bearings, pressed into aluminum castings. A coarse textured surface on the rollers prevents the grain from slipping and is the key to providing an efficient mill at far less cost then conventional multiple stage roller mills.
For additional efficiency, in high volume operations, a Gear Drive Option (GDO) is available to drive the passive roller directly from the driven roller through precision-ground, steel gears. These gears have different numbers of teeth, to provide a differential rotational rate for the rollers.
The standard rollers are fabricated from cold rolled steel. The crushing surface is 10″ long and 1-1/2″ in diameter, the largest in the home brew industry. Unlike some competing mills using hollow tubes, the MALTMILL rollers are turned down from solid bar stock. The bearing journals and drive shaft are integral to the roller and offer the ultimate in reliability. Stainless steel rollers are available as an option (where?) for use in humid, salty environments or where required by local codes. We also offer case hardened rollers for the very high volume commercial user to eliminate the need to return the rollers for re-knurling.
That was copied from the link provided above. My only concern with this mill is that the Model A (the only mill that provided the gear driven option for the secondary roller) is only adjustable on one side. I assume that’s the side opposite of the gears. This means that any adjustment is going to cause a gap that varies over the length of the rollers. Wider or more narrow at one end then the at the other. You need to be able to adjust on both ends to get the rollers parallel, with a consistent gap. You can do this and still have a gear drive option with a little bit of engineering. You just need to have the gap setting that curves along the gear. Hopefully the factory gap setting will be perfect and I won’t need to worry about it. A .045″ gap seems to be fairly close to the factory setting for all the malt crushers I looked at. Maybe I should consult George Fix’s write up on optimal grain crushing.
Another mill I looked at was “The Barley Crusher” which had good features and a really decent price tag on it (base price $114.00 at the site, + $17.50 shipping for the 7# hopper, the 15# hopper is slightly more.)
I did read on several discussion forums that this was a good grinder, but it needs to be disassembled when the slave roller stops turning. Apparently cleaning the bushings and reassembling will correct the problem. I didn’t like the idea of having a passive roller in the first place so I started looking for a model which drove both rollers.
Non-contenders – Crankandstein Grain Mill (lack of a gear drive), the MoreBeer Grain Gobbler (lack of details available) and the Victoria/Corona Grain Mill which I’ve heard nothing good about.
I’m down to one partially full keg in the kegerator.
I finally finished the funky dopplebock with the persistent foam on top – thank goodness.
Out of necessity, I’m going to violate my own rule of thumb that if “it’s less then 8% why brew it?” and brew a beer that I can finish off and keg within 2 weeks.
It’s been a while since I’ve done an ESB and there was a recipe in the recent BYO column (another Jamil recipe) so I thought I’d go online and get the ingredients. The recipe calls for around 3 ounces of Kent Goldings hops. Okay, I’ll get 7 ounces as a lot of recipes I’ve been brewing lately are calling for that variety and it’s hard to find. I also saw they had magnum and amarillo hops, and I want to brew a Dogfish Head 90 clone soon, so I bought 4 ounces each of those also. I still needed simcoe hops, so I had to go to another online site to get 4 ounces of Simcoe. Simcoe is almost impossible to find right now.
For those of you keeping track, thats 7 ounces Keng Goldings ($3.99), 4 ounces Amarillo ($5.99), 4 ounces magnum ($6.25) and 4 ounces of simcoe ($3.49). 19 ounces of hops at a grand total of $90.85.
Thats for two maybe 3 batches of beer. I haven’t decided what to do with the extra Kent Goldings, but I’m sure they’ll come in handy.
I’m really still in shock right now. I knew it was coming, we’ve been talking about it. This is another area of inflation, along with gasoline, food, electricity… everythings going up except for wages and the value of the dollar.
